Note: Radios that are set up for option 82 should be bridged. As of 2023 all DCB PMP450 radios are configured to do option 82 (though if a customer has a static IP address there should still be no router on the account and their router should be configured to do Static IP rather then DHCP). As of March 2025 network engineering has begun converting Bertram PMP450 customers to Option 82 on a site by site basis.
Bertram Fiber Option 82 customers should not need equipment changes to their account to work. Do not edit their equipment without direction from network engineering.
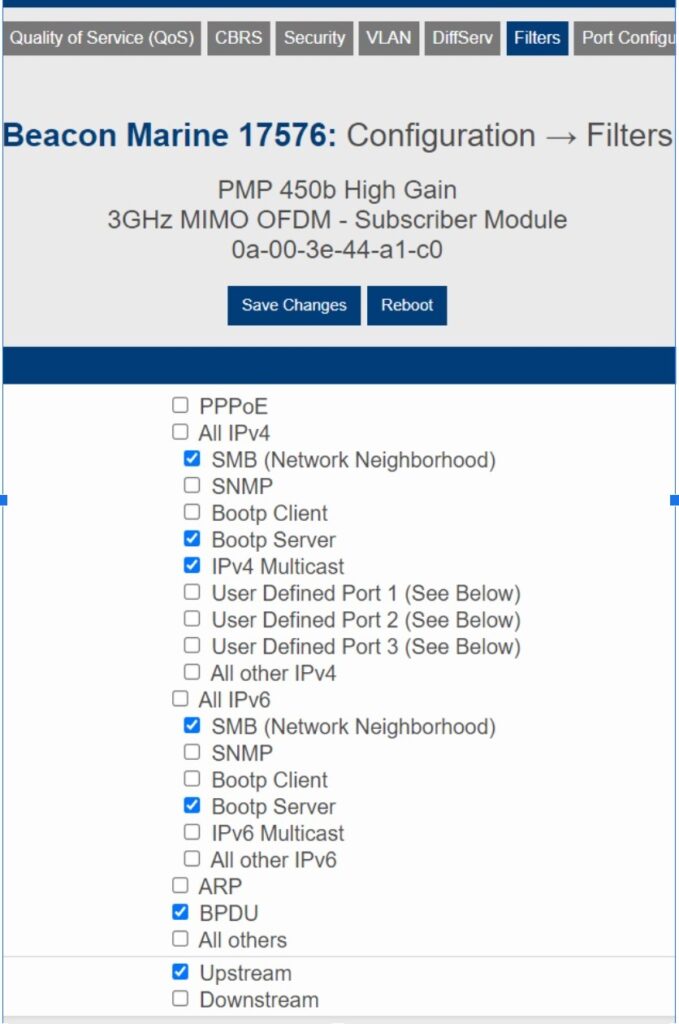
Radio Filters
The filter settings below are the correct settings to permit Option 82 to work on DCB. For Bertram PMP 450 customers on Option 82 sites, the filters don’t need to be identical but if the customer is experiencing issues, setting up the filters like below is recommended. These settings will only show up if the radio is bridged – if the radio is NATted you will have to switch it to bridged mode in the NAT settings and reboot it (these filters won’t appear until after the reboot). After saving the changes you will need to reboot the radio.
Setting Up Option 82 “Router” In Powercode
To add an option 82 router in powercode you will start to add the equipment just as you normally would.
- Name of equipment needs to be unique. Using the account name followed by “router” will work.
- If customer has a managed router the device category is “Managed Router” followed by the type.
- If 3rd party router use “Customer Owned Equipment” & “3rd Party Router”
- Under MAC Address switch from Manual to “Option 82” and then select “Remote ID”
- In remote ID add the Wireless MAC Address of the RADIO, in all lowercase without any colons or dashes. The wireless MAC address will be at the top of the radio.
- Select the “<Site Name> Customer DHCP Address range as normal and click Save.

When combined with the filtering that we did on the radio, this will enable option 82 and permit customers to swap their router at will without needing to update equipment on their account.