When upgrading customers to a faster speed plan it is important to to ensure that their radio is capable of providing the speed of the plan they wish to upgrade to.
DCB PMP450 Max Throughput Check
There is an extra step necessary when checking to see if customers on Door County Broadband can upgrade their service without swapping their equipment. While Bertram radios are unlimited, on DCB most 2.4GHz, and some 3GHz and 5GHz DCB radios are limited to only 10 or 20mbps.
The first thing you should do when checking on the upgrade potential for a DCB PMP450 customer is to log in to their radio and scroll down to the very bottom of the Home page under Feature Key Information and look for the Maximum Throughput.

This speed is the maximum combined upload and download speed that the radio will transmit, regardless of link tests, QoS settings or their plan speeds in Powercode.
If the customer has a 10mbps aggregate radio, then the fastest plan that we can offer without an equipment swap is the old Gold 8mbps plan of 8 down, 2 up. If the customer has a 20mbps aggregate radio, then the fastest plan that we can offer without an equipment swap is the Residential 15mbps plan of 15 down, 5 up. Unlimited radios will have no hard limits to the available plans.
You should check the link tests (see below) to determine if an equipment swap makes sense. If a link test on a throughput limited radio would not support a faster plan, then swapping the SM to a higher aggregate radio of the same frequency will not improve the available plan speeds unless the signal is improved as well
Running A Link Test – PMP450
To run a link test on PMP450 equipment select Tools -> Link Capacity Test and then Link Test without Bridging in the pull down menu. Then hit Start Test.
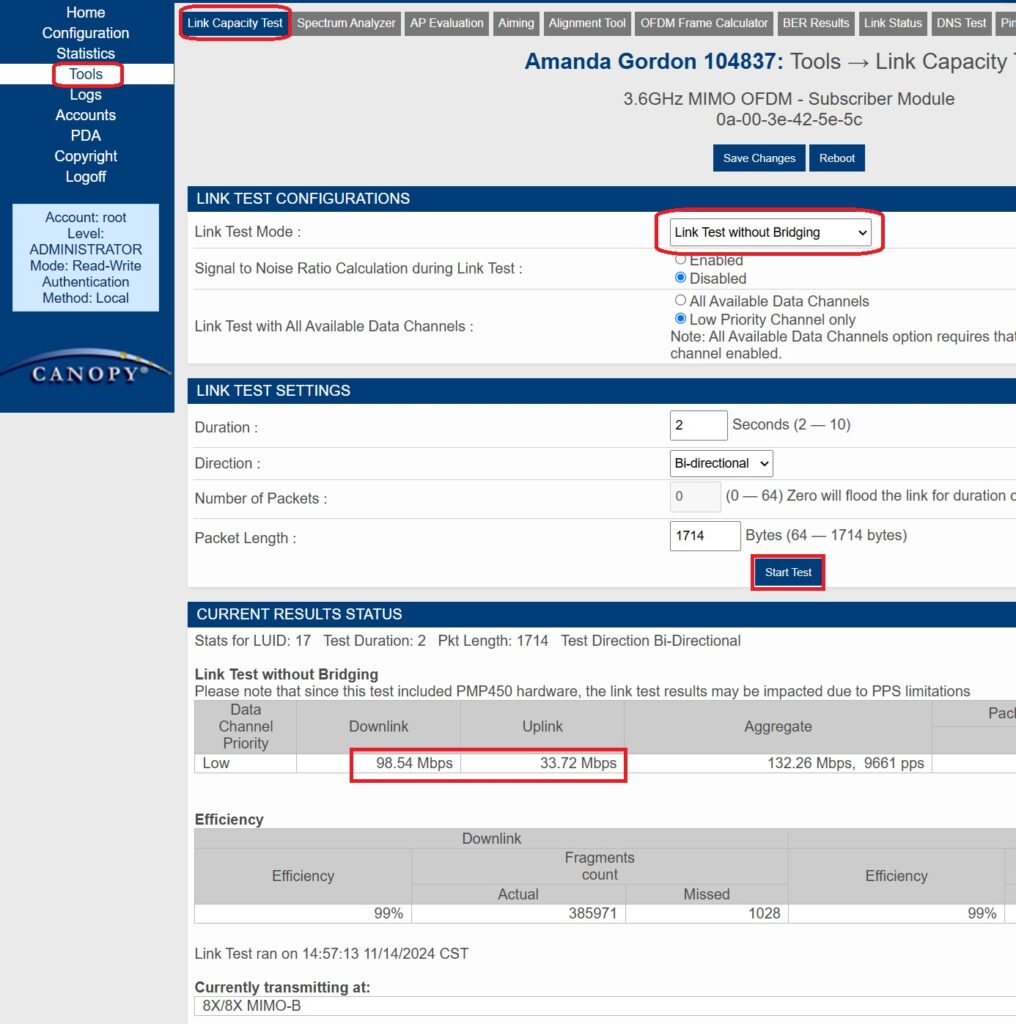
A general rule of thumb after running the link test is to divide the results in half to determine the maximum plan speed we can provide. For example if you have test results of 48 down and 18 mbps up, then the 25mbps Residential plan of 25 down, 10 up is reasonable. That said, any plans of 50 or 100mbps should get approval from network engineering to ensure that there is sufficient backhaul capacity on the site and the AP.
Running a Link Test – ePMP
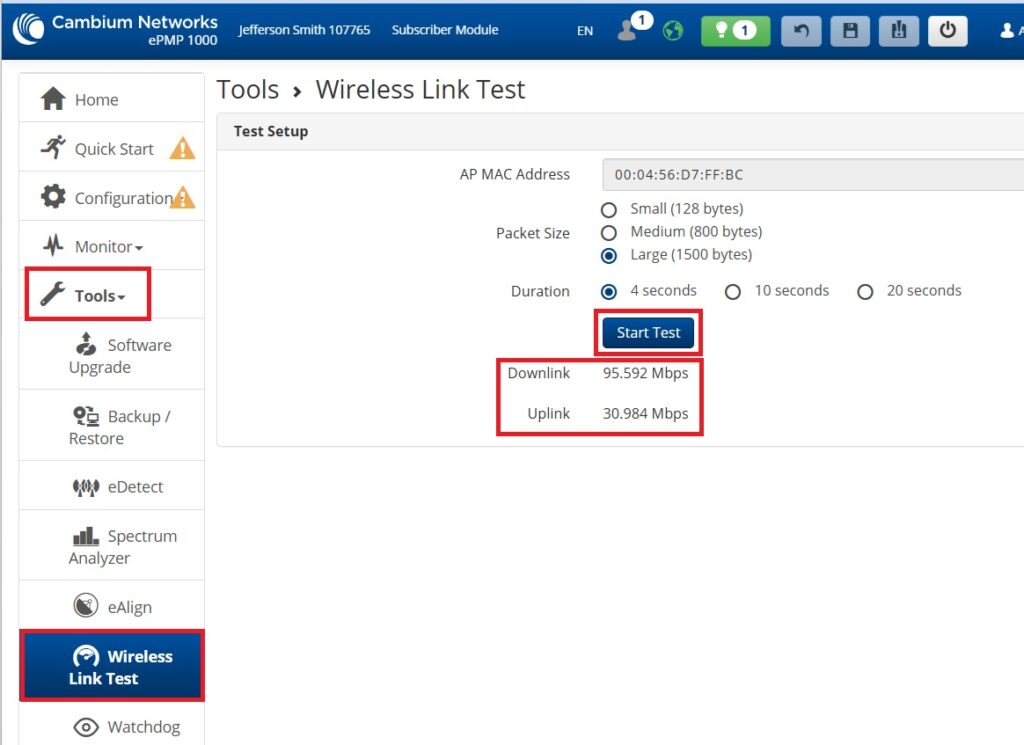
For ePMP radios you would click on Tools -> Wireless Link Tests and then Start Test. Again, divide the results in half to get the available plan speeds.
Adjusting Their Plan
To change the speed of their plan, on the Service tab of their account in Powercode click Add Service and then under Monthly Internet do a search in the pull-down menu for the plan you want to move them to. In general, you should uncheck the Pro-rate Service option in order to avoid generating a credit or charge and just tell the customer that while they will get their new speeds right away, the updated price will be reflected on their next bill. The new plan should replace their old plan on their monthly services.
Verifying/Checking QoS After a Plan Change (PMP450)
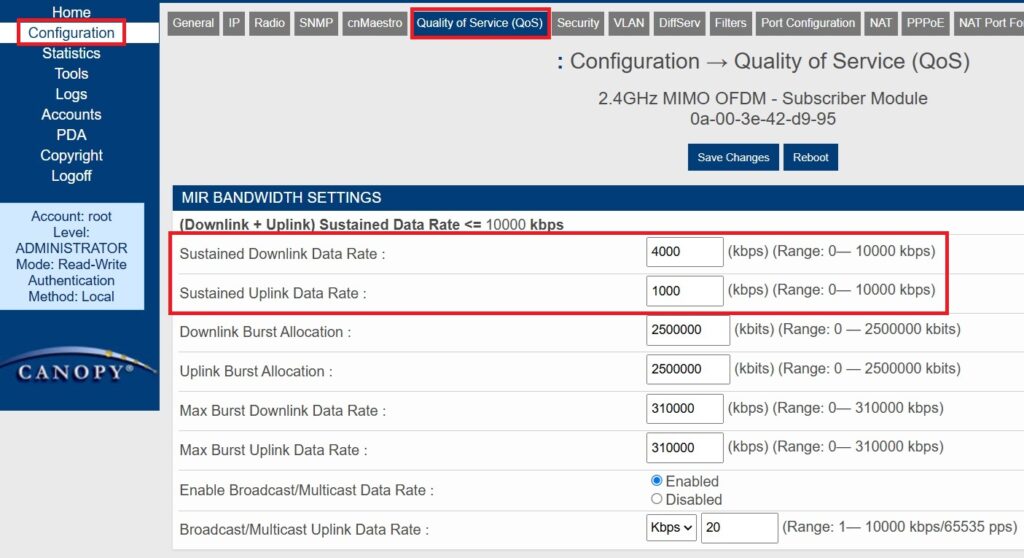
After the plan is changed Powercode is supposed to update the QoS settings and reboot the PMP450 radios, however certain settings (such as read-only SNMP permissions) can prevent the radio’s QoS from updating and permitting them to make use of the faster speeds. After upgrading the plan you should check the radio’s QoS by selecting Configuration->QoS. The sustained Downlink & Uplink Data Rates should be set to their new plan speeds. When doing so keep in mind that it is measuring in kbps so a 15mbps down, 5 mbps up plan should reflect 15000 down by 5000 up. Depending on the model of radio the order of the two could be reversed. If you end up needing to update the QoS settings, then Save and Reboot the radio.
Note that this is only necessary for PMP450 radios. Customers with ePMP radios (Bertram, DCB), or Ubiquiti radios (XL, Optic Loop) will immediately get their updated plan speeds.