- Updating An Existing Router MAC Address On An Account
- Adding A Router or Other New Device MAC To An Account
- Okay, Where Do I Find The MAC Address?
- Cambium PMP450 or PMP100
- Cambium ePMP Radio
- Ubiquiti Radios
- Powerbeam 5AC (Newer Software)
- Powerbeam M5 (Older Software)
- Optic Loop NIDs (Mikrotik)
- Bertram Fiber NIDs
- How to Add The Router If You Can’t Access Their Equipment
Important: Before beginning, if an account is set up to do Option 82 (Bertram Fiber or DCB PMP450s) then it is not necessary to update the MAC address on the account and you should not be making adjustments to their equipment.

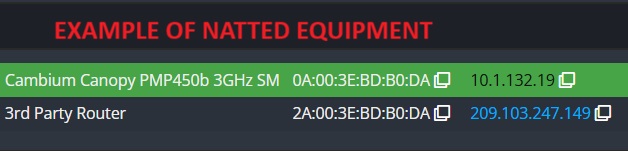
Also, if a customer’s radio is NATted (common on Bertram) then it is not necessary to update the MAC address. On Bertram you can tell that the account is set up in NAT by comparing the MAC address for the radio and router. The MAC address for the router will be almost identical to the radio, but starting with the number 2 instead of 0. On XL, if you do not see a router on a customer’s account then it is also very likely you do not need to add one. We will address XL more later.

Updating An Existing Router MAC Address On An Account
When updating the MAC address of the router on the account, if there is already a router MAC address on the account that they won’t be using any more you can just edit the existing router.
First, click More… to the right of the router.

On the next screen click the left most button, Edit Device.

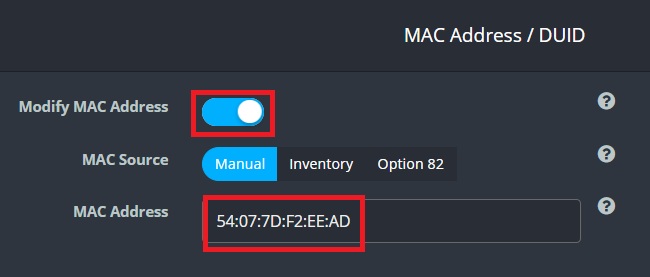
On the next screen go to the section that says MAC Address and toggle the button that says “Modify MAC Address”. This will allow you to edit the MAC address that is on the account to match what you are seeing in the bridging table of the radio.
You should not need to make any other changes here and you should be able to just click Save at the bottom of this screen. The router should get an IP address within a few minutes. Once in a while the customer may need to powercycle their router. If they have not done so already they will also need to set up their router.
Adding A Router or Other New Device MAC To An Account
Occasionally for testing purposes we may try bypassing a router or need to add a brand new router to the account. When doing so you will first want to check the radio on the account. The radio will normally be the piece of equipment that has a green or yellow background to it and have Cambium or Ubiquiti in the name. Once you have found it click More… on the right side.

On the next screen you want to look for the Address Range of the radio. Make sure to write it down or copy it into notepad. It will have the name of the tower or network segment the radio is on. You will need this information in a minute when you are adding the router. Radios will almost always have an address range that ends in “SM DHCP”.

After you have jotted down the Address Range of the radio you can click the Add New Device button at the bottom of the screen.

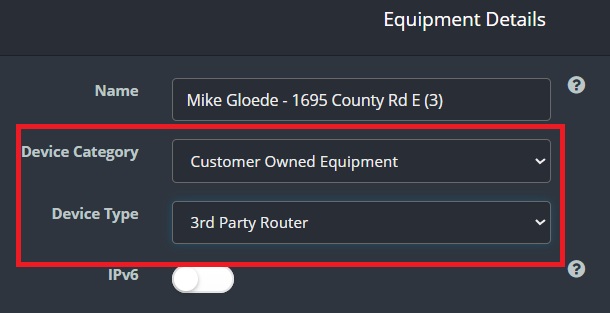
On the next screen you will be adding the router. On the top of the screen you will change the Device Category from CPE to Customer Owned Equipment and Device Type to 3rd Party Router (or Other if that is not available).
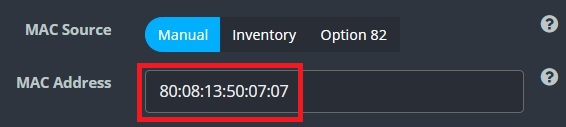
Further down, under MAC address you will be adding the MAC address of the router (or device they are using to bypass).
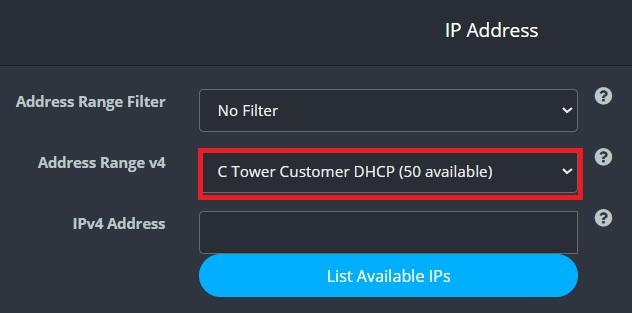
Under IP Address you will need to find the Address Range that starts with the same name as what the radio has. But instead you will be looking for the Address Range that ends in “Customer DHCP”. So in the example above where the radio was from the “C Tower SM DHCP” range, for the router we will be looking for “C Tower Customer DHCP”. While you can certainly click the “List Available IPs” button to select an IP address, it is not necessary to do so as Powercode will automatically assign the next available IP address when you save the equipment.
At the bottom of the page go ahead and click Save.

If you ever need to add a router to an Address Range that shows (0 Available) let network engineering know as they may need to create more IP addresses. Otherwise Level 2 may also be able to find a router on an inactive account to remove.
Okay, Where Do I Find The MAC Address?
Cambium PMP450 or PMP100
After logging into the radio, click on the Statistics link on the left side and then the Bridging Table tab on the top. The MAC address of the radio will show up on the Eth0 interface.
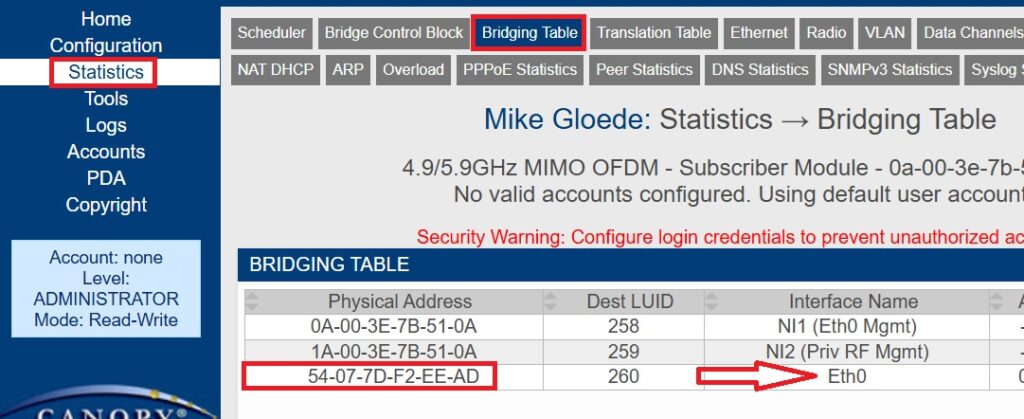
If you see more than 1 MAC address on the Eth0 port then they may be miscabled and plugged into the LAN port of their router rather than the WAN/Internet port (or the extra one may be the old router’s MAC address). After verifying they are plugged into the correct port, reboot the radio (this will clear out any old entries). After the radio comes back online, check again. The only other time you will see more than just 1 entry on the Eth0 port is if they have a Point To Point (PTP) system, for example going from a silo to their home. You can use a utility like Wireshark to check the MAC addresses and if the additional MAC addresses are Ubiquiti or Cambium then that is the likely reason.
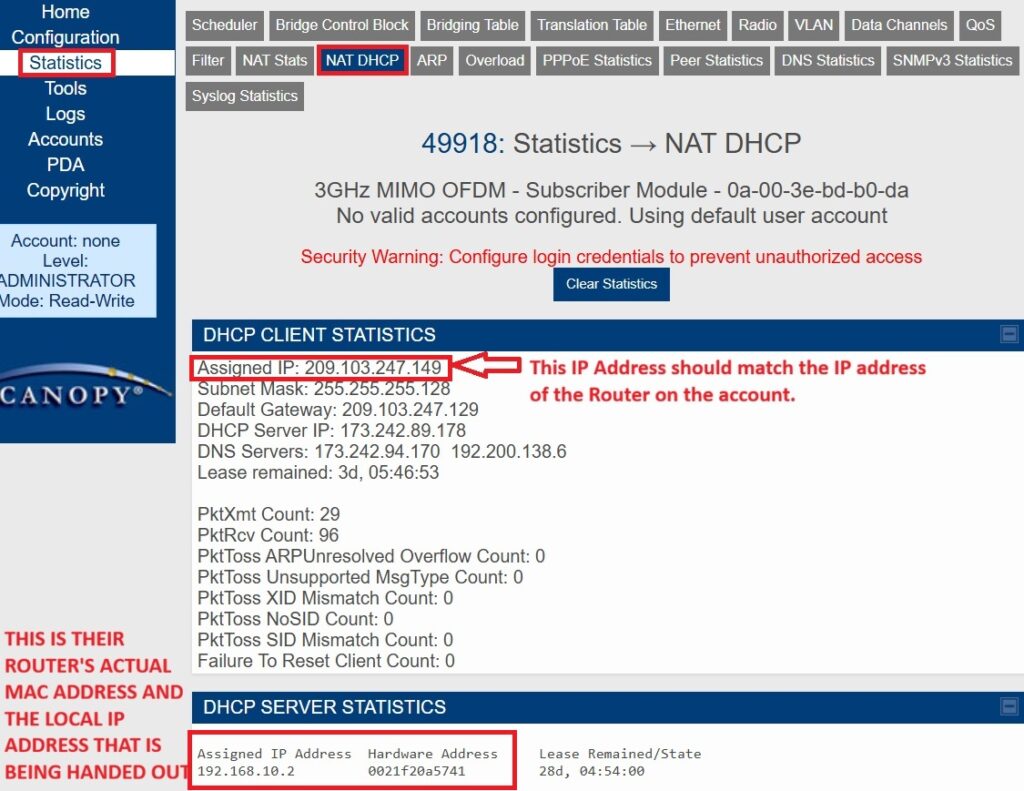
If you see the message “Bridge Disabled During NAT Operation” (below) then it means that the radio is NATted. Make sure that the router MAC address on their account matches the radio MAC address but starts with a 2 rather than a 0 in the first digit. In this case there is no need to change their equipment on their account.

With a NATted radio, the radio is actually also being given the IP address that is assigned to the router and is then handing out a local IP address to their router. You can click the NAT DHCP tab at the top. If the account is configured correctly you should see the (Router) Customer DHCP IP address on the top part of the screen. The customers actual router is on the bottom half of the screen because the radio is acting as a router and handing out a local IP address to their actual router.
Cambium ePMP Radio
After logging into the radio, click on the Monitor link on the left side, followed by Network
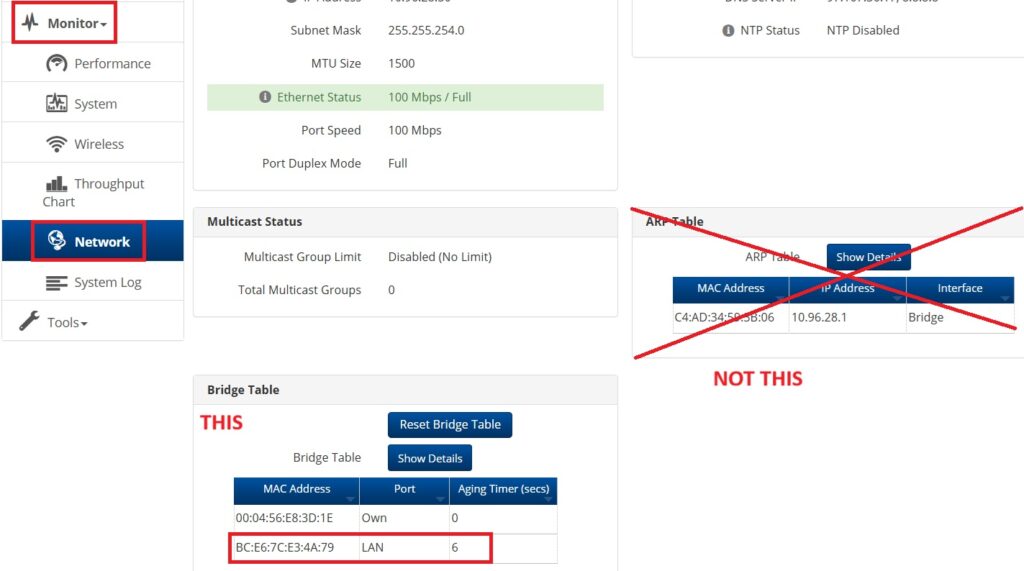
You will be looking for the MAC address that appears on the LAN port in the Bridge Table which is usually on the left half of the screen. You will often also see the radio’s own LAN MAC address which is labeled as “Own”. This can be a bit confusing because the ARP Table also has an interface that is labeled as Bridge but that MAC address is not correct. Just like on PMP450, if you see more than 1 device on the LAN port they are either miscabled to the LAN port of their router or they have a Point To Point system.
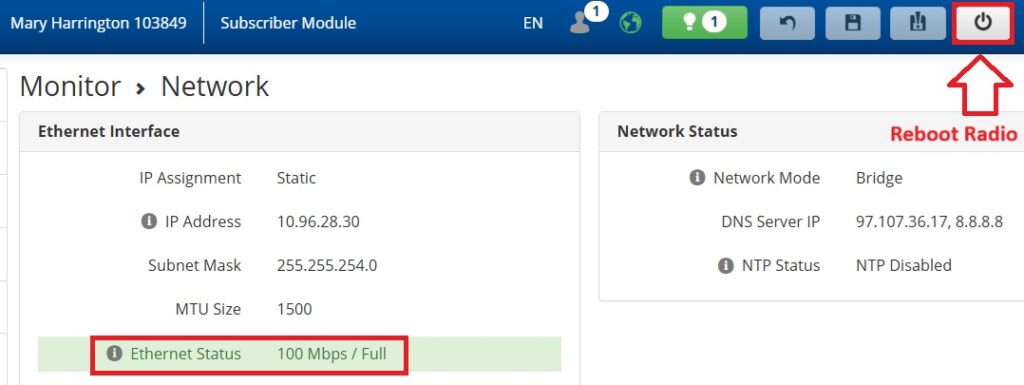
Once in a while on ePMP radios the router MAC will disappear from the Bridge Table. You should be able to reboot the radio by clicking the Power button in the upper right corner of the screen and after the reboot it should show up. As long as the ethernet status is green and not flapping (switching between being down and up) there should be a link to the router.
Ubiquiti Radios
Before talking about Ubiquiti, it is important to know that on XL a lot of radios are NATted and we do not need to add the router’s MAC address if they are switching routers. On XL, if you look at a customer’s account and only see the radio under equipment then their radio is likely NATted.

Due to this, for each of the types of Ubiquiti radios we will first show where to find the router’s MAC address in the bridging table if they are bridged. But we will also show you where to find the router’s MAC address in the ARP table if they are NATted. This is useful at times in order to confirm that the router is working or that the radio is seeing the router.
Optic Loop radios should always be bridged.
Powerbeam 5AC (Newer Software)
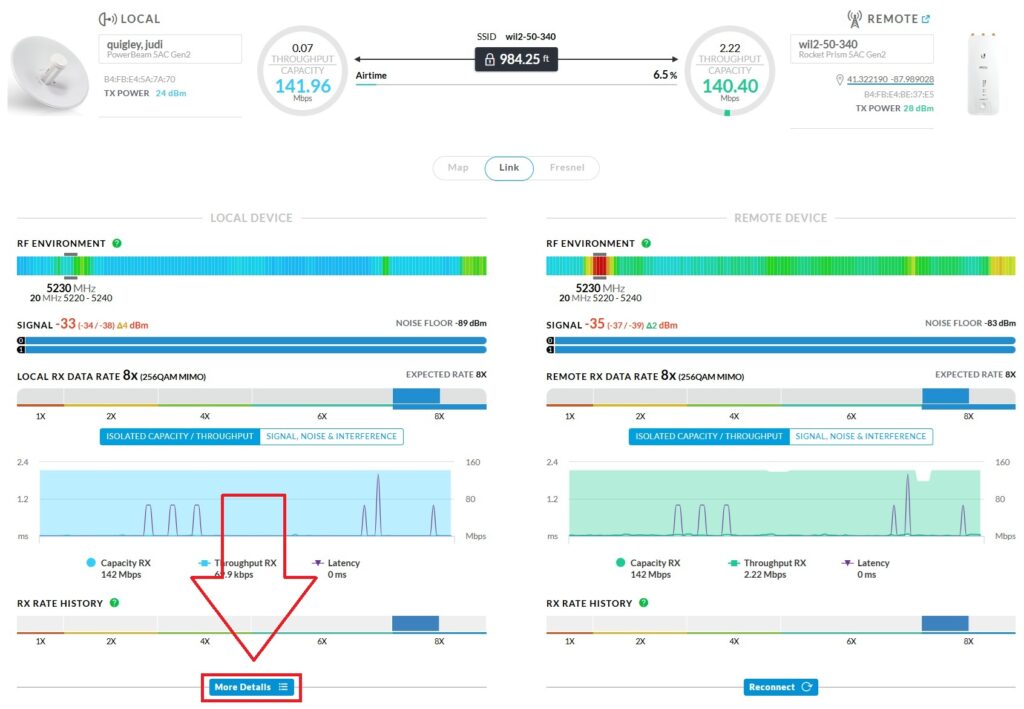
After logging into newer Powerbeams you will see the signal and equipment at the top of the screen. Regardless of whether the radio is NATted or Bridged you will be clicking on the button on the left half of the screen that says More Details
Bridge Table – After clicking on the More Details button, you should click on the Bridge Table tab and on the Interface column until you see LAN0 on top. The MAC address that appears will be the router. If there is more than one MAC on LAN0 they are either miscabled or have a point to point system. If you don’t see anything on the LAN0 interface then the radio doesn’t see their router or the router isn’t working correctly.
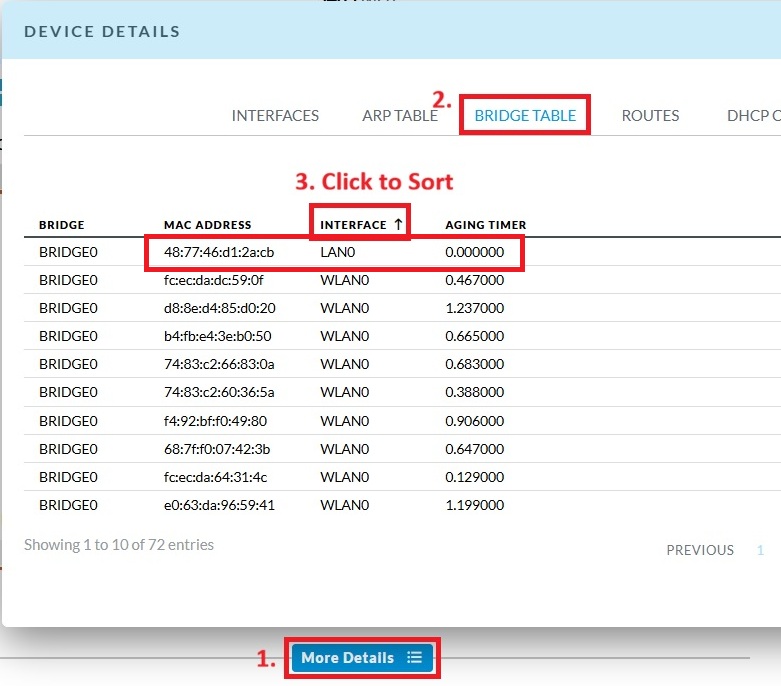
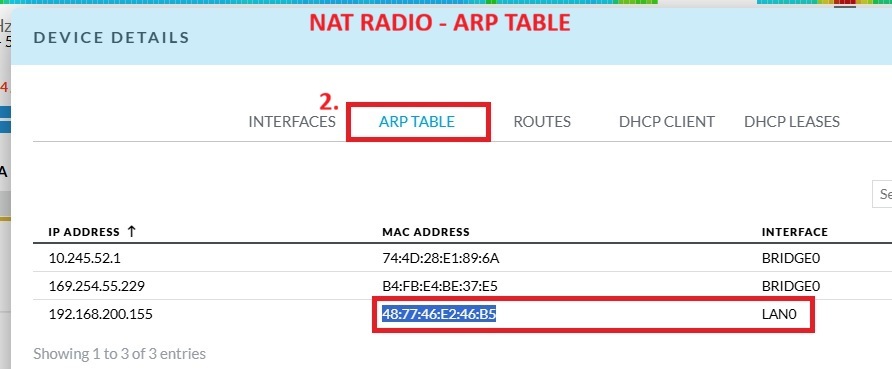
ARP Table (NAT) – If the radio is NATted there will be no Bridge Table tab. Instead you can click on the ARP Table tab. The router will show up on the LAN0 interface there. Again, you do not need to update the MAC address on the account in this case. If there is more than one MAC on LAN0 they are either miscabled or have a point to point system. If you don’t see anything that the radio doesn’t see their router or the router isn’t working correctly.
Powerbeam M5 (Older Software)
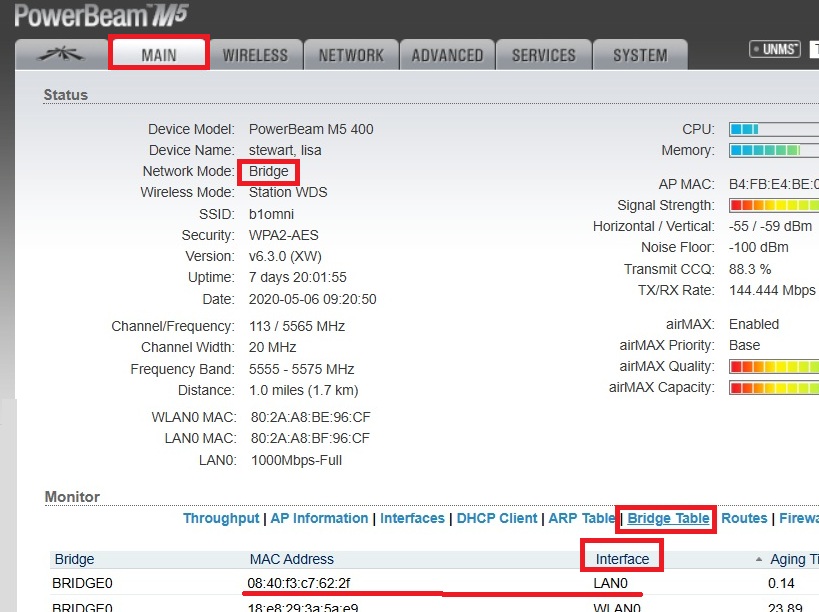
Bridge Table – After logging into an M5 or similar radio you can click on the Bridge Table in the center and then Interface to sort the LAN0 interface to the top. The MAC address by the LAN0 interface is the router’s MAC address. Note that the Network Mode says “Bridge”
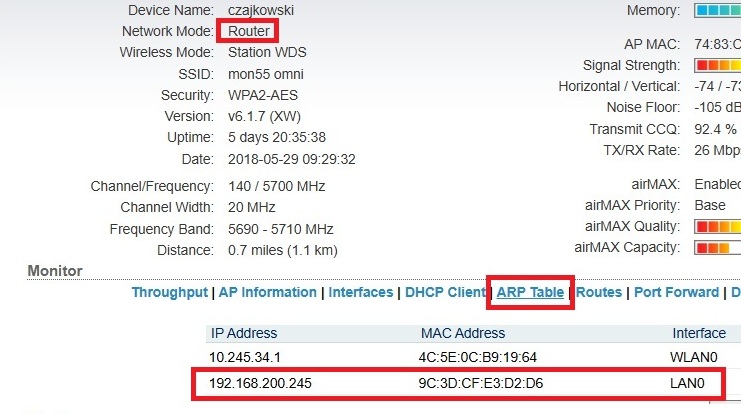
NAT – If the radio is NATted there will be no Bridge Table tab. Instead you can click on the ARP Table tab. The router will show up on the LAN0 interface there. Note that the Network Mode says “Router”
Optic Loop NIDs (Mikrotik)
Finding a router MAC address on an Optic Loop fiber customer can be complicated by the fact that many customers have a shared NID so there may be more than one customer connected to the same piece of equipment.
After logging into the NID, click on the Interfaces on the left side. If it is a shared NID you should see a unit number or street number on the ethernet ports. In the example below, this NID is shared between 4 units that are numbered from 208 to 211 that correspond with specific ethernet ports.
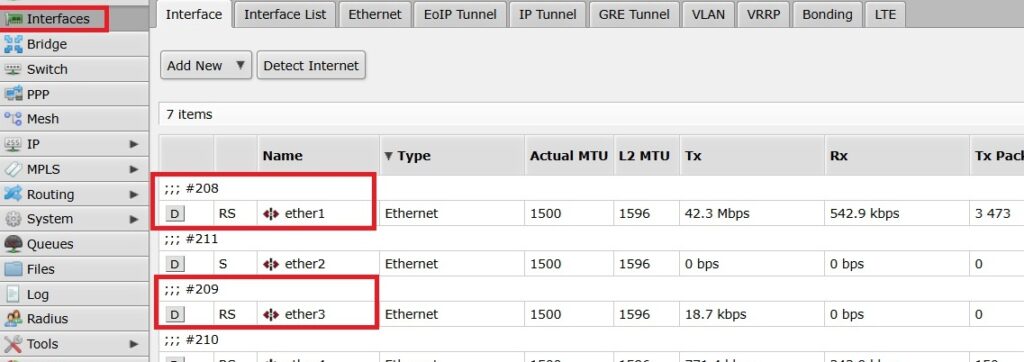
Next, click on Bridge on the left side, followed by the Hosts tab that is the second one from the right. You may need to sort by “On Interface” to get the ether ports to the top. A port that has a router plugged in will usually have 2 entries. One will be a MAC for the NID itself while the other will be the customer’s router. The exception is port 1 where the corresponding NID MAC will be bridge1
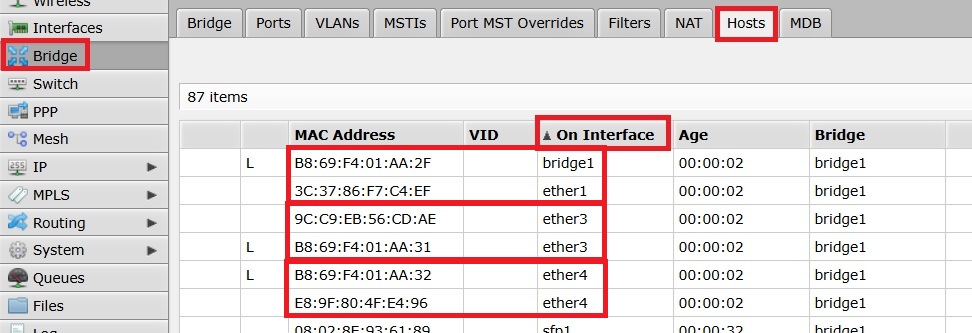
Look for the ether port that corresponds to the MAC address of the NID that is on their account and whichever other MAC shows up on that port should be their router.

Bertram Fiber NIDs
You should generally not ever need to update the MAC address of a Bertram fiber customer as they are all supposed to be Option 82. If you are on the phone with a Bertram fiber customer whose router is not Option 82, you should alert level 2 or network engineering.

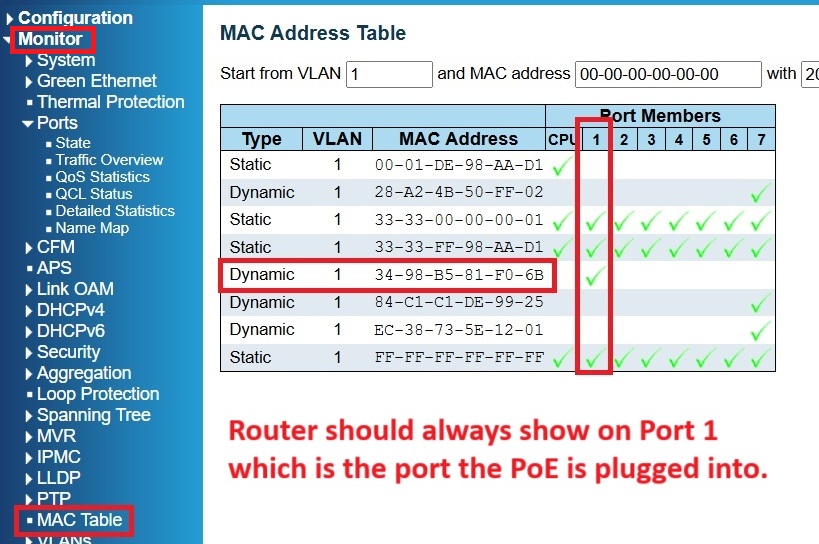
That said, it is useful to know where to go to verify that the NID sees the customer’s router at the other end of the link. After logging into the NID, click on Monitor and then MAC Table. Most of them are the NID itself. There should be 1 MAC address, however that is only showing up on Port 1 and that will be their router. As always, if there is more then 1 MAC address that only shows up on port 1 then they may be plugged into the wrong port on their router or it is malfunctioning.
How to Add The Router If You Can’t Access Their Equipment
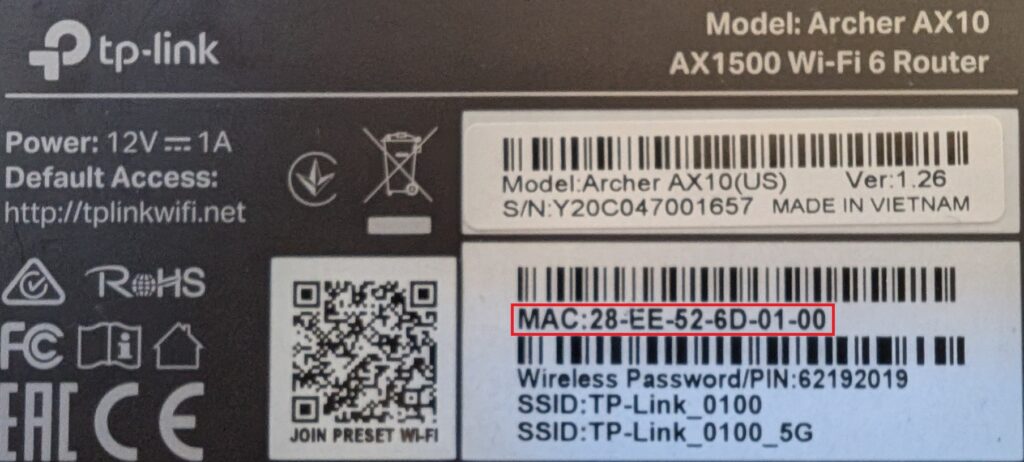
If something is occurring that is preventing you from accessing the customer’s equipment, despite the fact that you know it is up and running there is one last thing you can do to try to get the router MAC address added to the account. Most router manufacturers do put a MAC address on a label on the bottom of their router. Unfortunately, that MAC address is always the wrong one (it is the LAN MAC address rather than the WAN MAC address). If you have them read you the MAC address from the bottom of the router you can take the MAC address they give you and usually add 1 to the last digit and that will be their router’s WAN MAC address. Since MAC addresses are Hexadecimal, if the last digit is a letter use the next letter in the alphabet (A becomes B, B becomes C, etc.)
In the example below the MAC address on the label is 28-EE-52-6D-01-00
If the customer reads that number to you from the label you should instead put in 28-EE-52-6D-01-01 (note the change of the last digit)